Build a Weather Application using GraphQL and ChakraUI
A must-have project for your Resume!

🌀Self-taught Web Dev ⚡Pursuing Electrical engineering 🏀Athlete
I was clueless a year ago, and today I'm a Web developer! But the thing to note is, I love what I do❤
Never Give up!
I was using RestAPI architecture initially and life was going good but turns out, GraphQL is much more popular than I thought.
I then went on a quest to determine why GraphQL was so much preferred over RestAPI.
My findings proved to be resourceful, and I was surprised to see the results.
Let's say you're on a project, using RestAPI. You want to fetch some data. The data that comes from the endpoint is a JSON object over which we have no control, to choose which data to be received by the front-end. What you finally get is maybe a long JSON response.
Now let's see what happens when you use GraphQL. You get a JSON response back in the same way, but it looks like I can choose over a range of parameters available, and select the data only which is required to be displayed in the application.
In this way, your application is bound to perform much better and the response you receive is fast and selective.
After this, I was eager to learn GraphQL, and what's better than to make a project on it.
According to Web Dev Simplified a project which includes handling any API and manipulating it on your front-end is a must-have on your resume.
I thought, why not make a Weather application, since I didn't make any yet.
Let's make use of this GraphQL weather API for the project.
We'll be using ChakraUI on the front-end. So if you have not worked with ChakraUI before, this tutorial will be perfect to get started!
Here are the steps we'll be going through in this tutorial
- Explore the PlayGround and set the parameters.
- Setting up front-end with ChakraUI
- Handling requests
- Using the response to display on the front-end.
- Using ChakraUI to show a loading state and enable Dark Mode
Resources to build the project
GitHub repo - https://github.com/GeoBrodas/graphql-weatherapp
Live Link - https://graphqlweather.netlify.app/
Explore the PlayGround and set the parameters
Head over to the Weather API.
You'll see an interactive playground in action.
What you see is a query that contains a bunch of parameters. Now if you run the query, you'll see a response, with resultant data for each parameter that was entered.
Now what we want is very concise. The parameters that I will be using are name, weather, temperature, and wind.
The query now after modifying should look like this
query {
  getCityByName(name: <Your_City>) {
    name
    weather {
      summary {
        title
        description
      }
      temperature {
        actual
        feelsLike
      }
      wind {
        speed
      }
    }
  }
}
In place of Your_City, enter your city or any of your choice.
Still, we won't be using all the data, but for now, go ahead and run the query.
Setting up front-end with ChakraUI
Let's now set up the front-end with Chakra UI
First Install Chakra UI using npm
npm i @chakra-ui/react @emotion/react@^11 @emotion/styled@^11 framer-motion@^4
Now set up the provider in the root file - src/index.js
import React from 'react'
import ReactDOM from 'react-dom'
import { ChakraProvider, ColorModeScript } from '@chakra-ui/react'
import App from './components/App'

ReactDOM.render(
  <ChakraProvider>
    <ColorModeScript initialColorMode="light" />
    <App />
  </ChakraProvider>,
  document.getElementById('root')
)
ColorModeScript is a component for tracking the light and dark mode, which we will be enabling towards the end.
Let's now make a new component called Dashboard.js in the src/components directory.
First, let's make an Icon button for toggling the dark mode.
import React from 'react'
import { VStack, IconButton } from '@chakra-ui/react'

export default function Dashboard ( ) {
return (
  <VSack>
    <IconButton
        aria-label="Toggle Dark Mode"
        m="8"
        size="md"
        alignSelf="flex-end"
      />
  </VStack>
)
}
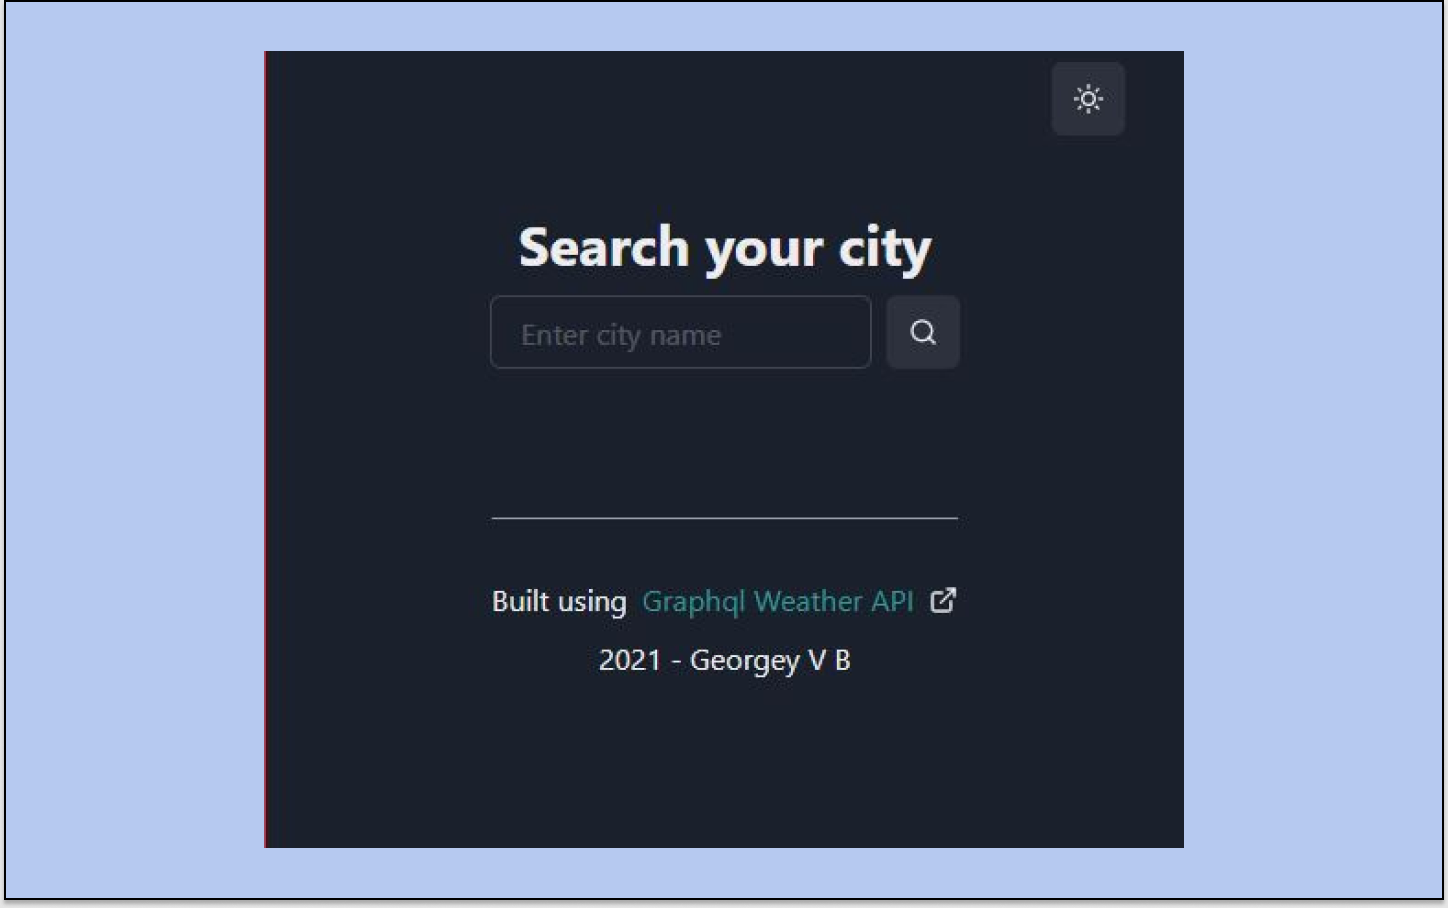
Now prepare the Heading and Input fields
import React, { useState } from 'react'
import {
  Input,
  VStack,
  HStack,
  IconButton,
  Heading
} from '@chakra-ui/react'
import { FiSearch } from 'react-icons/fi'

export default function Dashboard ( ) {

  const [result, setResult] = useState('')
  const [value, setValue] = useState('')

 return (
<VStack>
      <IconButton
        aria-label="Toggle Dark Mode"
        m="8"
        size="md"
        alignSelf="flex-end"
      />
      <Heading mb="8" size="xl">
        Search your city
      </Heading>
      <HStack>
        <Input
          type="text"
          placeholder="Enter city name"
          value={result}
          onChange={(event) => setResult(event.target.value)}
        />
        <IconButton
          aria-label="Search city button"
          icon={<FiSearch />}
          onClick={() => {
            setValue(result)
            getWeather()
            //Errormessage()
          }}
        >
          Search
        </IconButton>
      </HStack>
</VStack>
)
}
We are now done with the input fields. Go ahead and console log the data from the input fields to check whether the states are behaving the way they should be. If you run into any errors, don't forget to check the GitHub repo I have shared.
Handling requests
To interact with the API, we need to install some packages to set up GraphQL in the app itself.
Install the following packages,
npm install graphql @apollo/client
Like how we wrapped ChakraProvider around our App component, we need to do the same for our App to handle graphQL requests.
Make the following changes in your App.js file inside the src/components directory.
import React from 'react'
import { ApolloClient, ApolloProvider, InMemoryCache } from '@apollo/client'
import Dashboard from './Dashboard'

export default function App() {
  const client = new ApolloClient({
    cache: new InMemoryCache(),
    uri: 'https://graphql-weather-api.herokuapp.com/',
  })

  return (
    <ApolloProvider client={client}>
      <Dashboard />
    </ApolloProvider>
  )
}
Here we are defining a constant, and initializing the Apollo client by feeding in 2 parameters- cache and uri. Parameter uri is the default API end-point we are using here, and cache makes sure that the app doesn't send unnecessary requests for the same data.
Now let's create a new file say Queries.js. I will create this in a separate directory src/components/graphql.
The file will contain the query, which we had earlier created in the playground.
import { gql } from '@apollo/client'

export const GET_WEATHER_QUERY = gql`
  query getCityByName($name: String!) {
    getCityByName(name: $name) {
      name
      country
      weather {
        summary {
          title
          description
        }
        temperature {
          actual
          feelsLike
        }
        wind {
          speed
        }
      }
    }
  }
`
For passing in the name of the city, we'll pass it through $name, passed through the input field.
If you have worked with MongoDB schemas, this notation will be much more familiar.
To know more about GraphQL schema types visit the documentation at https://graphql.org/learn/schema/
Now let's make a request to the API endpoint and log the response.
Head over to the Dashboard.js file and make the following changes.
import { useLazyQuery } from '@apollo/client'
import { GET_WEATHER_QUERY } from '../graphql/Queries'

export default function Dashboard ( ) {
  const [getWeather, { loading, data, error }] = useLazyQuery(
    GET_WEATHER_QUERY,
    {
      variables: { name: value },
    }
  )

// Search button for input field
<IconButton
    aria-label="Search city button"
    icon={<FiSearch />}
    onClick={() => {
      setValue(result)
      getWeather()
      }}
 >
    Search
</IconButton>
}
When the button is clicked, two events get triggered. One is the setValue() state we defined earlier and getWeather( ) function upon which the request is sent and in turn, the response is fetched and stored in the data variable.
The value state is passed to the name property which we defined earlier in the src/components/graphql/Queries.js file.
Now if you console.log(data), you should be able to view the response sent back from the API endpoint.
Using the response to display on the front-end
The response we get back from the end-point is an object, which we got hold of previously with the data variable.
Now let's display the response to the front-end in form of a sleek table.
We'll make use of Chakra Ui's Table component here.
Refer Chakra UI's documentation if you get lost any time
https://chakra-ui.com/docs/data-display/table
Import the following components
import {
  Stack,
  Table,
  Tbody,
  Tr,
  Td,
  TableCaption,
  StackDivider,
  HStack,
  Divider,
} from '@chakra-ui/react'

// Dashboard component
<Stack>
        <Divider mt="4" mb="4" borderColor="gray.100" />
        {data && (
          <>
            <VStack
              divider={<StackDivider />}
              borderColor="gray.100"
              borderWidth="2px"
              p="4"
              borderRadius="lg"
              w="100%"
              maxW={{ base: '90vw', sm: '80vw', lg: '50vw', xl: '40vw' }}
              alignItems="stretch"
            >
              <Table variant="simple">
                <TableCaption>
                  Weather in {data.getCityByName.name} right now
                </TableCaption>

                <Tbody>
                  <Tr>
                    <Td>Temperature</Td>

                    <Td textAlign="right">
                      {Math.floor(
                        data.getCityByName.weather.temperature.actual - 273
                      ) + ' '}
                      Deg C
                    </Td>
                  </Tr>
                  <Tr>
                    <Td>Feels like</Td>
                    <Td textAlign="right">
                      {data.getCityByName.weather.summary.description}
                    </Td>
                  </Tr>
                  <Tr>
                    <Td>Wind speed (mph)</Td>

                    <Td textAlign="right">
                      {data.getCityByName.weather.wind.speed + ' '}
                    </Td>
                  </Tr>
                </Tbody>
              </Table>
            </VStack>
          </>
        )}
      </Stack>
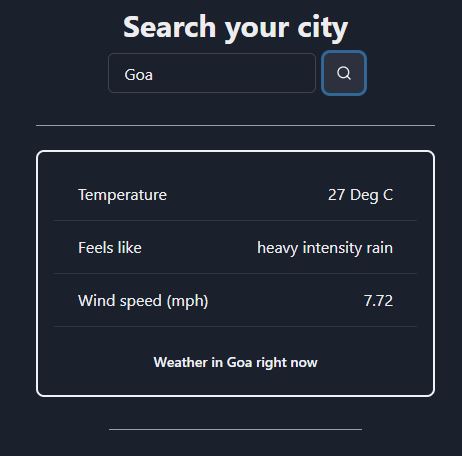
It's similar to the HTML tables we used to do back in the old days. But most importantly we can get hold of the data coming back from the response.
Here, if you have noticed, I have converted the kelvin unit which was by default coming back from the response, to celsius using the formula - temperature in kelvin - 273 = Temperature in celsius.
I would suggest reading the Chakra UI documentation for more clarity on Chakra Ui Table component.
Your final output should look something like this -
Using ChakraUI to show a loading state and enable Dark Mode
While writing the logic for getting requests from the GraphQL server, we had destructured a variable called loading. This state can be used to determine whether the process of retrieving the request is under process or not.
We can make use of Chakra UI's spinner component here.
The logic for displaying the spinner would be as follows
import { spinner } from "@chakra-ui/react"
// Dashboard.js component
<Stack>
        {loading && (
          <>
            <Spinner
              thickness="4px"
              speed="0.65s"
              emptyColor="gray.200"
              color="blue.500"
              size="xl"
            />
          </>
        )}
</Stack>
The and operator will ensure that the spinner component will only get displayed if the loading state is true.
Let's now enable dark-mode in our app!
Head over to the Dashboard.js file and make the toggle button for dark mode functional.
import { useColorMode } from "@chakra-ui/react
// for the icon to change on toggle -
// if light: show Moon Icon else show Sun Icon
import { FiMoon, FiSun } from 'react-icons/fi'

const { colorMode, toggleColorMode } = useColorMode()

// toggle button for dark/light mode
<IconButton
        aria-label="Toggle Dark Mode"
        icon={colorMode === 'light' ? <FiMoon /> : <FiSun />}
        m="8"
        size="md"
        alignSelf="flex-end"
        onClick={toggleColorMode}
/>
So now, when the user clicks on the button, toggleColorMode is triggered. In turn, changes the colorMode state, hence changes the icon based on light / dark, which is implemented using the ternary operator.
Well, congrats on that great hustle! You have a Weather application ready at your disposal.
Make sure you add it to your resume!
Thanks for Reading🎉
It's great to see that you have enjoyed the article. Now let's not do the same thing. Try to add some of your own features to the app, and make it unique from the rest. Make sure you tag me on Twitter if you have built this application.
On to another blog, some other day, till then adios👋.
Support me🙌
My constant source of energy is coffee! If you feel I deserve one


